Wednesday, November 20, 2019

00 - Intro - Deciding to Become A Bad Guy Doing Good


People embark on a project of this nature for divers reasons.  Here's my story.

My name is Dave Johnston.  I was born in 1970.  I met the girl I would eventually marry when we were both employees at Disneyland.  We got married in 1991.  Together we have 7 children (four of whom are married) and as of this writing 2 grandchildren with number 3 on the way!

I worked at "the Park" when Star Tours first opened.  I always wanted to be a Stormtrooper or Rebel Pilot, but it just never worked out that I got the chance before I stopped working there in 1990.

Fast forward two and a half decades and our oldest son (Crew) found himself working for Disney World in Orlando.  I started joking (perhaps only slightly so) that "I'd pay a thousand dollars for a day as a Stormtrooper with my adult sons".  Then, in 2018, our second oldest (Reef) finished his first Commando Build and got 501st approval and membership.

I stood by more than just a bit jealous as he would share his Trooping stories.

Finally, in Fall of 2019, I realized that failure to join him (and his brothers who had started working on their own 501st builds) would be a huge regret.

All that was left was to get started!

Often easier said than done.  This isn't a path for which there's a set book or manual, but that doesn't mean it can't be accomplished!

The posts that follow will both chronicle my journey and experiences.  I'll also include some (hopefully) valuable tips, stories and resources.


I picked a FO TFA (First Order - The Force Awakens) Stormtrooper because:

a) I like the flexibility of character
b) They seem to be in high demand
c) I think they look cool!
d) I love the idea of being one of those "Bad guys doing good" (see the video, below), raising money for charity, and perhaps spreading a little Star Wars Joy to others.

I've been told that there are not yet any FO TK's in my area (Timberline Garrison); perhaps this blog will help others to join!


Or at the very least, be a resource for others who, like me, are ready to make this dream a reality.

Cheers,


- Dave


Please Note:  I'll keep updating these posts as I remember more and find better links and pictures.  They may not be in "exactly" the order that things happened, and I might not remember the dates correctly.  Please feel free to share this blog with anyone who you think might find it helpful or interesting.  The links here are provided to be helpful, not to endorse a particular person, product, page, organization, company, or service.

01 - The Journey Begins

November 2, 2019


Once you decide to start down the Build Your Own Star Wars Costume path, and you've decided what you're costume is going to be, you're then faced with the THE BIG QUESTIONS:

Are there any rules that would keep me from getting approved in the costume I like most?  (Are height and weight, size and age, factors?)

How do I even get started?

Where can I buy pieces and parts?

Are there some places to buy (or some suppliers) better than others?

What kind of armor should I get?

Who can help me?


ARE THERE COSTUME LIMITATIONS?

First of all, while on a personal level I'm not a huge believer in Super Tall Jawas, Round C3PO's or Tiny Darth Vaders (except for kids; THAT I think is just cute as all get out), it doesn't seem like there's much in the way of telling people what they can and can't do.  That said, there ARE some costumes that seem to be a little  . . . "friendlier" to those of us (like myself)  who aren't . . . "typical Star Wars Cast body types".


Stormtrooper armor can hide quite a bit (though it CAN be a Big Challenge if the armor needs to be adjusted a lot to fit you, whether you're a lot bigger, taller, shorter or smaller).  Rebel Pilots, Imperial Officers, and Tusken Raiders are some great options to consider.


HOW DO YOU GET STARTED?

As for where to get started . . . if you have a friend (or in my case, a relative) who's done this before, that's a Huge Advantage.  If you're blazing a new trail, a great place to start is to go to a 501st event and talk to the members there.  Everyone I've met is Super Kind and Helpful.  (Seriously, this is one of the most open and accepting and understanding groups of people you'll ever meet.)

If you're not sure where and when the events in your area are, if you're too far away, or if you just like doing a little more research first, go to the 501st web page.  There's tons of information there, including a link to a page (and the discussion forums) for the Garrison that covers your area.

There also are some Extremely Helpful Facebook pages and blogs that are well worth searching for and joining.

With Reef as my guide I joined my local garrison (Timberline Garrison, covering Idaho and Montana), and a couple Facebook Pages (First Order Stormtroopers - THE most helpful site; Anovos First Order Stormtrooper Kit Building Group - very informative, and 3D Printed Armor and Weapon Props - because, well . . . IT'S COOL!).


While you can't officially become a "member" of the 501st and Garrison pages until you're ready to submit for approval, you CAN join the forums and ask questions and stuff.  Plus it's a great idea to introduce yourself as a perspective member to your local garrison; they'll be a ton of help!


WHERE CAN YOU BUY PIECES AND PARTS? 

ARE SOME SUPPLIERS BETTER THAN OTHERS?

WHAT KIND OF ARMOR SHOULD I GET?

A Great Resource for those looking for Stormtrooper Armor is whitearmor.net.  There is no better place to start when you're ready to shop.

Other resources include:


Star Wars Kit Finders


(There's more than one Star Wars Kit Finders page, BTW) 


Note:  this stuff can be Expensive.  It's an investment.  But that also means that there are Too Many people out there hiding behind safety of the internet who are more than happy to rip you off.  Tons of confirmed stories of people who "say" they have armor to sell (eBay is notorious) and even legitimate companies (like Anovos) can keep you waiting for months . . . Even YEARS . . . for your items to be shipped . . . so Be Careful!

Armor comes in a couple different materials, each with it's pros and cons.

I opted for a Flexible Fiberglass kit made by Jim Tripon (he's in the Philippines).  While it's what I wanted, I also really got lucky.

More about that in the next post!

02 - The Armor Arrives

November 7, 2019


So, like I suggested in the last post, when I started looking for armor I checked out eBay (tempting, but can be Very Risky), etsy (a lot less risky, but really just best for parts and pieces - I'll cover that more later), whitearmor.net (highly recommended!) and joined the First Order Stormtroopers Facebook page.

It was on the First Order Stormtroopers page that I saw that one of the guys was looking to sell a Jim Tripon Flexible Fiberglass FO TK kit that he had.  He said he had bought it and realized he just had too many projects going.

That was great news for me!

His pricing was fair, but more than that he was a) a guy in the same country I'm in and other guys vouched for his honesty; b) had the kit boxed and ready to go.

Note:  These kits, even the ones made by a big company like Anovos, are often made at time of ordering, so they can take A LONG time (some people have been waiting for Anovos kits for years), so do your due diligence and be prepared to wait a few weeks . . . at least.

So  . . . I bought it!

It arrived beautifully packaged in under a week.


I really regret not taking a picture of the inside of the box (a video would have been even better).  Jim Tripon is kind of famous for how efficiently he packages a set of armor, but I was just two excited to unpack everything.  (Plus, let's not lie, this is a lot of money to spend, especially on line, and I was worried not everything would be in the box or as described.  My apologies to Jim Hall, whom at the time I did not know at all.)


It's not as big of a box as one might expect.  (20wx22x16h)


I unpacked everything and set it out on the Kitchen Table.  (My wife was surprisingly understanding!)

This picture shows some of how things were packed and the box in the background.


Here's everything slightly better organized.


And I call this picture "The Obligatory New Raw Helmet Selfie"


I posted these pictures on our Family Messenger and on The First Order Stormtrooper Facebook Page.

These are the response GIFs from my boys:


from Crew


From Reef


Let the Fun begin!

03 - Resources and Supplies

November 8, 2019


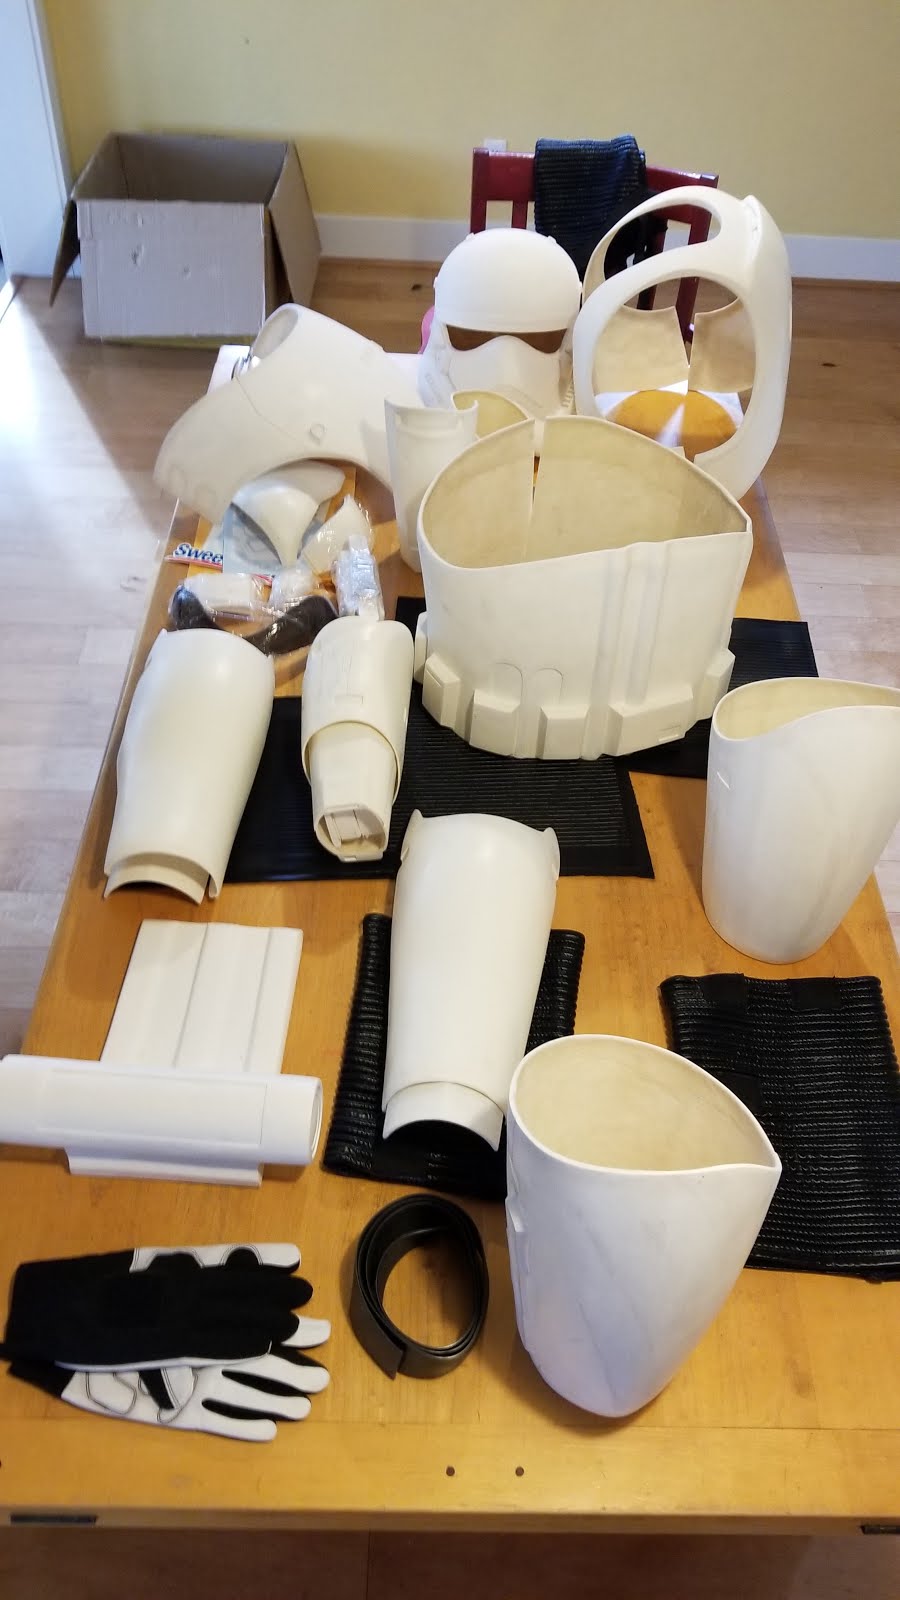
Your armor has arrived.

You laid it out on the table or floor . . . you've stared at it . . . dreamed about it . . . but at some point you're going to have to Go To Work!

The most valuable resource for me has been the First Order Stormtroopers Facebook page.


With members around the world who are knowledgeable and kind, you can post a question, issue or problem (with photos is always best) and often get answers in a very short period of time from people who've been there and dealt with that before.


As for supplies, there's so much that goes into assembling your armor than the paint.

Reef took me to our local Ace Hardware and JoAnn's for our initial supply run.


Devcon 5-Minute Epoxy - great for attaching stuff (like snaps) that you don't want to ever move

Rare Earth Magnets - for stuff that you'll need to pop on and off, but don't want to separate easily (I'll mostly be using these for putting my Chest Plate over my Yoke)

Industrial Strength Velcro - I got the 48" x 2" strips in white and black.  I'll used them for thinks like my Shin Guards, and attaching the Boxes, Cod Piece, and Posterior Plate to my belt

Buckles - a 2" one for the belt, smaller ones (not pictured - Reef had a ton of them left over from his first build) for the harness

Straps - for making the harness and connecting things that don't need to flex

Snaps - for attaching nearly everything to nearly everything else

Elastic - for connecting the things that do need to flex

Bondo Automotive Filler - for filling in imperfections, cracks and general repairs

Small Screws - to attach the Holster to the Right Thigh (apparently all Stormtroopers are Right handed)

Sandpaper - 80 and 120 grit for knocking down excess Bondo, 240 and 320 grit for smoothing things out

Paint - Rustoleum (fingers crossed!)
- Primer - Gray
- Gloss White
- Flat Black


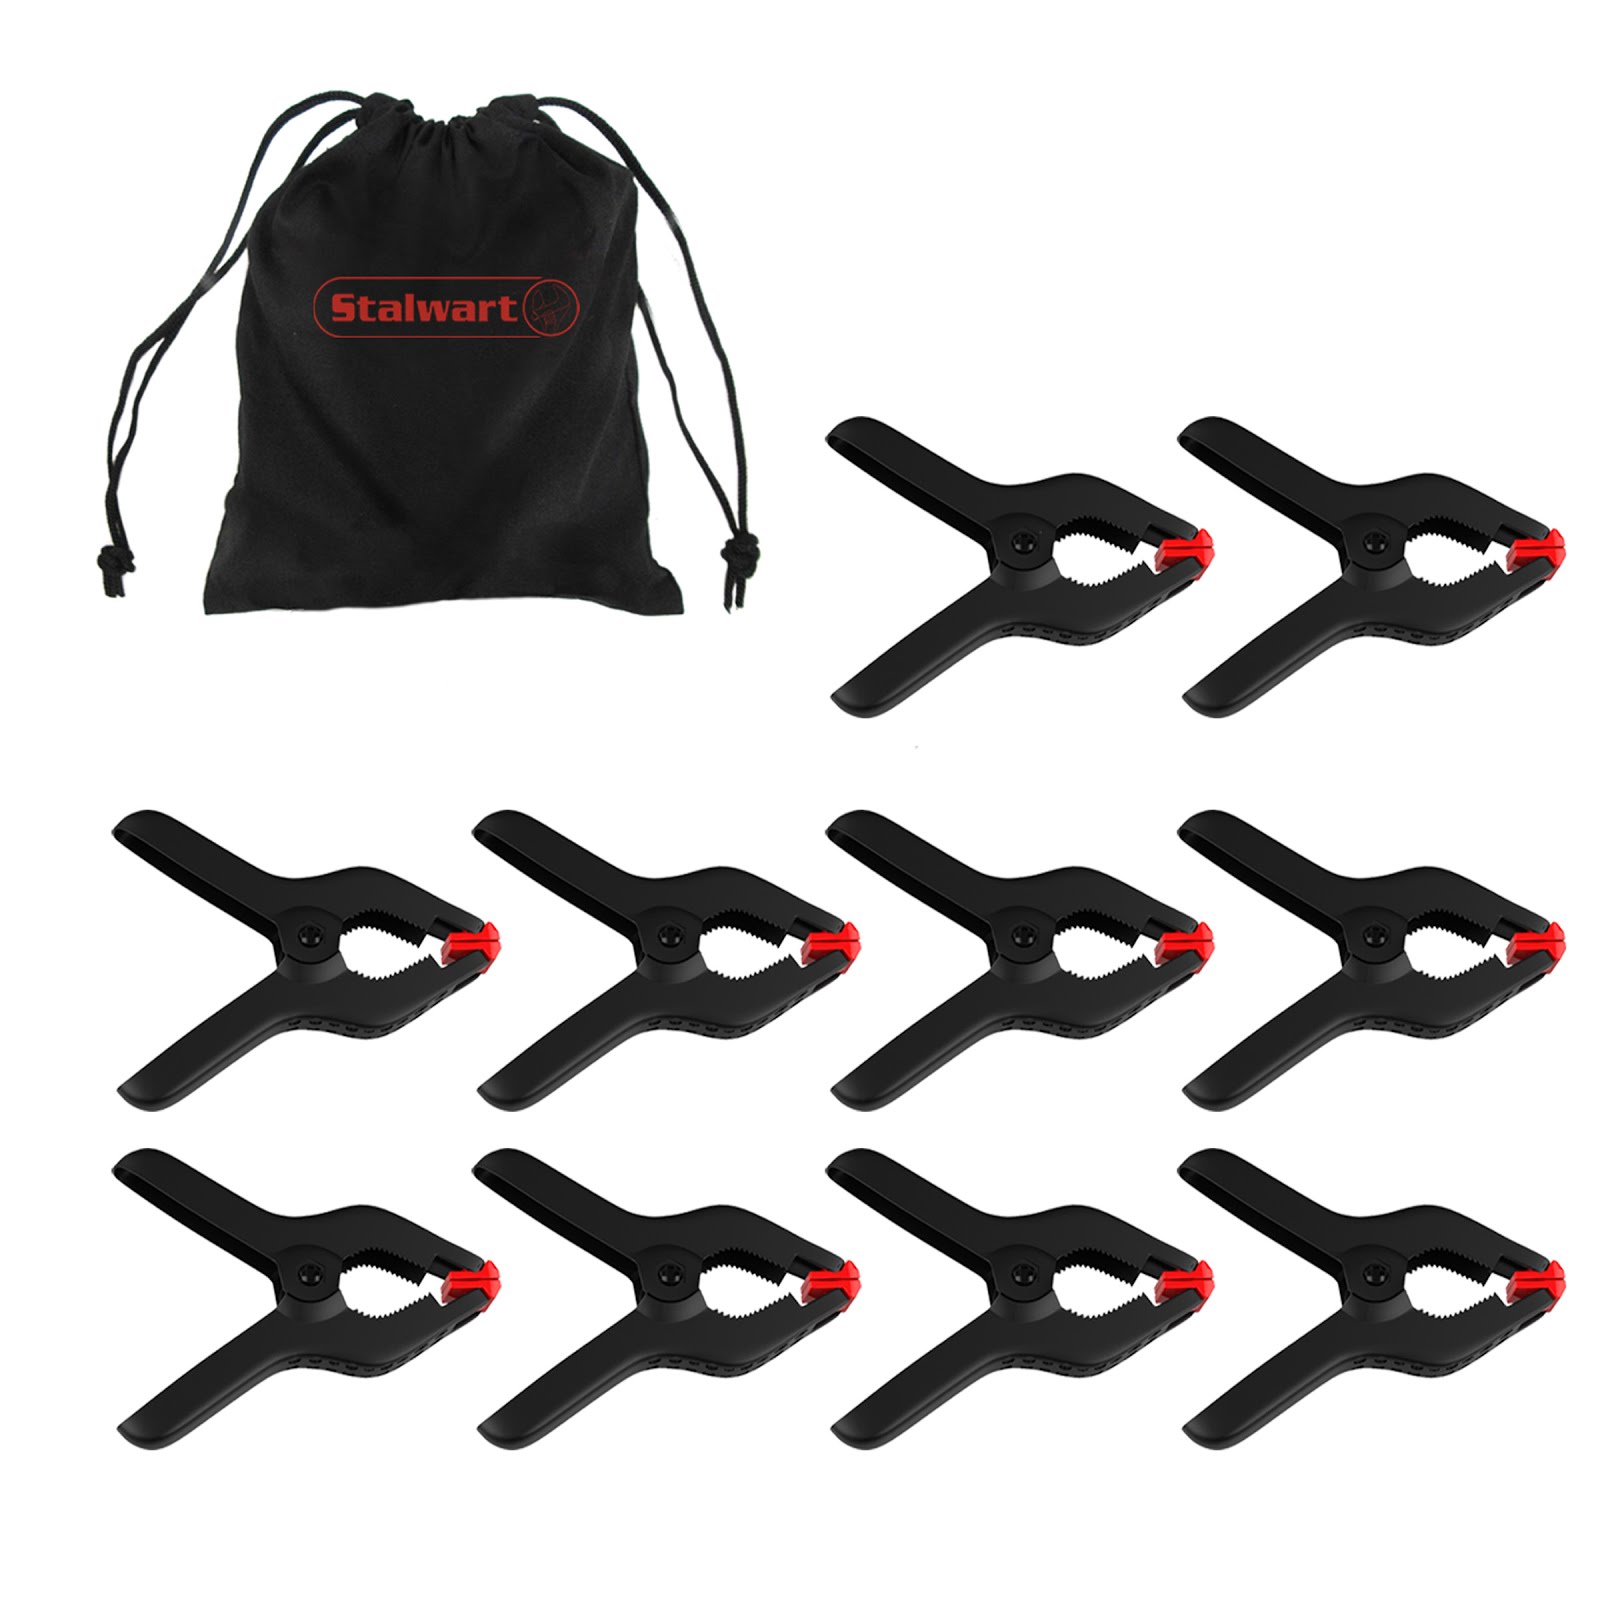
Other things you may want to get that are not pictured:


Clamps.  Spring-loaded and with soft "teeth".
Reef got these at Wal-mart and they have worked very well.


Dremel Tool.  Reef already had a good one, and my kit didn't really need trimming to fit me, but if you don't have one or have access to one, you'll want to go out and pick one up.  We recommend a corded one over the cordless.   $70 at Home Depot, Lowe's, or just about anywhere.


Popsicle Sticks - great for mixing Bondo and Fiberglass Resin (I found this cool kit at Amazon.com that has sticks and little containers for mixing Epoxy or Resin.)


My armor came with all of the "white" pieces I need, including the helmet (not all kits include the "bucket", btw), a raw belt, gloves, and the shoulder, elbow and knee gaskets, but there was still A LOT of parts I needed to buy, including:


- Balaclava (not required, but personally I think seeing skin or hair is a no-no; and if you think about the angles that kids have when looking up at us in costume . . . ).  I got mine on Amazon.com
(Amazon is also an affordable resource for belts, buckles, and snaps if you have time to wait for them to be shipped.)


- Belt Pouches (I bought mine on etsy from the same person that made my Neck Seal) - these ARE required.  You need the big pouch to hid the buckle of the belt.


- Blaster - Not Required, but I couldn't imagine Trooping without one.  Saw a post for the one I bought on First Order Stormtroopers and bought it from him through etsy.


- Boots - got mine from Imperial Boots out of the UK.  $99 US plus $35 shipping.  Once I placed my order they came in about 2 weeks, but the way they work is that they open their on line store for orders for just a couple days, then once they have enough orders they stop taking them for a while.  Once those orders are filled they start up again.  You have to keep checking back.


- Neck Seal - absolutely required (bought mine on etsy)


- Under Clothing - I got mine from the local Walmart in the workout clothes section.  It needs to be black, no logos showing, and I highly recommend long sleeves and pants.  (Fiberglass can be itchy, kids!)  Some people like stuff with spandex in it, but I went with a mostly cotton blend.  Shirt $8.  Pants $17.  I bought two of each . . . because that's how I roll.


Note:  Most of these vendors Do Not take credit cards directly.  You'll want to open a PayPal account if you don't already have one.  You can like PayPal to your bank account OR to a credit card.  I think the second option is best, especially if you need to dispute a purchase that did not come as promised . . . or did not arrive at all.

If you need Gaskets, Geeky Pink is a great resource.


There are other cool items and upgrades you can order.  I'll cover those in another post.


One of the Most Important Resources, especially if you're hoping for 501st Approval (and I certain am) is their website:  501st.com.


Specifically you'll want to look at the pages they have that break down each approve-able costume, part by part, and describe what you'll need and what it should look like.


THIS IS THE LINK FOR A TFA FO TK.


One last thing I will add:  I mentioned that these items are expensive, and that can be true, but it's also true that the Trustworthy people who are making these items because they love being a part of this community deliver truly top notch product.  Very high quality stuff.

04 - Glue, Fill, Sand, Repeat


November 14, 2019


Your armor isn't going to get ready for painting by itself . . .


It would be great if we all had access to a warehouse or locker room full of parts all finished and laid out for us . . . but unless we get cast as Disney Characters or Extras in the next film . . . (and sometimes not even then!)

Scary as it might be . . . it's time to get to work!


(Most people I've talked to have said that first cutting / gluing / patching experience is a bit . . . scary.  So if you feel that way, you're not alone!)

Even the best kit of armor is very likely going to need some adjustments to fit your body type, some filler to fix those typical imperfections that come with any 3D print or mold . . . AND you're going to have to do SOMETHING to get the parts to attach to each other when you put them on.

I KNOW painting is the exciting part . . . believe me!  But don't rush to get there Too Soon.  Taking your time now to make things "just right" (or as "just right as you can") will lead to a much more satisfying result.


The first thing to do is to identify the parts that need filling.  Reef taught me that the best way to do this is to look over each piece carefully and circle items with a pencil.


You'll want to identify and cracks (like on my Thermal Detonator Pack - left) and any "holes or indentations" (like on my Thigh piece - right).


Circling with a pencil will help you know how much work you have to do and help you keep from missing anything.


And Don't Worry!


The pencil marks will be hidden by the primer later, so you won't even need to erase them (though you can if you'd like).


For repairing cracks and filling holes I chose to use Bondo brand automotive filler putty.

It comes in two parts that need to be mixed together.  The bulk of it is a gray putty that is a bit "sludge-like" in viscosity.  That's the stuff in the can.  The second part is a pink "hardener" that comes in a tube.

FOLLOW THE DIRECTIONS AND BE SURE TO HAVE PLENTY OF
1) ventilation (be outside if you can!)
2) warm soap and water to clean your hands
3) rags, paper towels
4) tools for mixing and spreading


WARNING:  It sets up FAST.  That means:
- if it gets on your clothes it's Not coming out
- don't mix up more than you can use before it sets (you'll only mix a little bit at a time)

(Reef has a philosophy of "mixing just barely enough"; I would rather waste a little than not have enough to do what I want to do right now)

Mix on a paper plate or in a small plastic dish that you intend to throw away.  DO NOT pour the hardener into the can!!!  If you do, you'll be buying a new can.

In my first go I mixed some on a big piece of cardboard, which was fine but I had to discard the cardboard when done with that session.  Now I mix on a paper plate.  Less to discard and I like the "safety" that the edges of the plate offers.


Here are some pictures of the Bondo on my Thermal Detonator Pack.  Because the crack was significant I applied it pretty . . . "thick".  That means more sanding later, but that's not as hard as it sounds.


We used 5 Minute Epoxy to glue things like Snaps and Magnets.     
                                                                                                                  We used stronger Epoxy for things like Greeblies on and gluing the front and back Shin pieces together.  The Blue Painter's Tape helps to hold things together while they dry.                                                                                                                                                                        We also used a lot of clamps.                                                                                                                                                                                      Like Bondo, Epoxy dries quickly so don't make up more than you can use at any one time.                                                                                                                                                                                                We left the inside seam of the shins un-glued and will be using Industrial Strength Velcro there so that the Shin pieces are easier to put on.  Reef's idea.  He's a genius.                                                                                                                                                                                   *Note:  With the Jim Tripon kit there wasn't a whole lot that needed to be glued Nor trimmed.  Everyone's experience will vary.


Magnets and snaps were added inside the Yoke and Chest Plate.

The snaps will be used to attach the Shoulder Bells to the Yoke and the sides of the Yoke to each other.  (We'll manufacture some elastic straps with snap ends for the sides, and non-elastic straps for the Shoulder Bells.)
 These ARE NOT "regular magnets".  We got rare earth magnets (Super strong!  They can be tough to remove and will happily pinch your skin into a blood blister if they're given the chance.  Like the package says, DO NOT let children play with them.)
The circles on the out side (in pencil) helped us line up the magnets.  We would "sandwich" the fiberglass pieces between the magnets, then circle the outside magnet, take the inside magnet off and put epoxy on it, then use the outside magnet (in the circle) to help us line up the magnet with epoxy in the right place.


IMPORTANT SAFETY TIP, EGON:  Reef says "Be wise about putting the Epoxy cap back on correctly.  If you try to force (no pun intended) it on 'backwards' then any residue in the cap may activate the liquid still in the tube . . . and That Means that you'll be throwing it away and buying more Epoxy".


These pictures so some of the Bondo after having been sanded smooth.  First with 120 grit sandpaper, (80 grit where it was "super chunky"), and then 320 grit to finish it off clean.  Get it smooth, but don't sand so aggressively that you damage your armor.


05 - Repairing Cracked Fiberglass - the Yoke is Broke!

November 15, 2019


I had a slight crack in the left arm hole of the yoke.  I discovered it after we'd been "filling and sanding" for a day or two.

Initially I tried to fix it with Jet Glue and Bondo.  (Jet Glue is "like" Super Glue, and it dries super fast.  The women in my house use it on their pointe shoes.)


Sanding the Bondo down the next day and my repair didn't hold.  In fact, it looked worse.


So off to the First Order Stormtroopers Facebook page to ask for help.

Got some great advice.

Here's what I did:

1.  Sand things down.

2.  Use Super Glue inside and out.

3.  Once dry, apply a coat (or 2 or 3) of Fiberglass Resin.  (Bondo Brand makes the one I used.)
*Notes: 
- The amount of hardener the container said to use wasn't nearly enough
- Most Fiberglass Resins stay sticky so you can add more layers
- DO NOT apply heat to try to get the Resin to dry . . . the risk of fire is real!

4.  I applied Resin (as recommended) to other areas of the Yoke where I thought stress fractures were likely.

5.  I applied a layer of Bondo putty on top of the Resin at the cracked area.

6.  I re-sanded.

*Note:  For the areas where the Resin was not going to be topped by anything I applied talcum powder to take away the "stickiness residue".

06 - Storage

November 16, 2019


How are you going to keep your TK parts from getting damaged in between Troops?

Where are you going to store all of your supplies and tools?

I have dreams . . . dreams of a really cool storage box / crate for my armor . . . in my head the look something like this . . .


Or this one . . .


Aren't these Super Cool!?!?!?!


Maybe some day . . .


Those boxes are based on (or similar to) this 50 gallon Husky Storage container.  It has wheels, a padded pull-out handle, looks industrial, and has a great tray inside for holding small items.  Only $50 US at our local Home Depot.


I actually bought one!  But, sad day, it wouldn't fit in my truck with the cargo cover on.  So I had to take it back.  I kept looking.  Hit every hardware and warehouse store in the area.  Even looked on line.


I finally settled on this 45 gallon Husky container from Home Depot.  It's not as big (obviously) gallons-wise, but it does have wheels, and does seem to hold all of my stuff.  For now . . .

Plus it was only $25 US!


I'm still trying to figure out which arrangement of things will work best.

As long as I have some where to put my things when my wife wants the kitchen table cleared . . .

I've been playing with different padding to protect my gear.  Here you can see some foam  acoustical tiles.


After trying several different boxes (and being very grateful for local return policies), I picked up this small tool box for "armor making and emergency repair supplies".


I got it from the local Ace Hardware.  I haven't been able to find it online. 

00 - Intro - Deciding to Become A Bad Guy Doing Good

November 1, 2019 And you may ask yourself, "well, how did I get here?" - David Byrne People embark on a project of this ...